
Introduction
Continuous Integration also known as CI is a software development practice where members of a team integrate their work frequently, leading to multiple integrations per day. The integration is verified by an automated build to detect integration errors as quickly as possible. This approach leads to significantly reduced integration problems and allows a team to develop cohesive software more rapidly. It has the potential to enable and trigger a series of incremental process improvements, going from a simple scheduled automated build right through to continuous delivery into production. A good CI infrastructure can streamline the development process right through to deployment, help detect and fix bugs faster, provide a useful project dashboard for both developers and non-developers, and ultimately, help teams deliver more real business value to the end user.
Continuous Integration, in its simplest form, involves a tool that monitors the version control system for changes. Whenever a change is detected, it automatically compiles and tests the code. If it fails, then the tool immediately notifies the developers so that they can fix the issue. Continuous Integration can also help to keep tabs on the health of the code base, automatically monitoring code quality and code coverage metrics, and helping keep technical debt down and maintenance costs low.

Jenkins is an open source continuous integration tool written in Java. Jenkins was originally, known as Hudson. In 2009, Oracle purchased Sun and inherited the code base of Hudson. In early 2011, the project forked into two separate entities: Jenkins, run by most of the original Hudson developers, and Hudson, which remained under the control of Oracle. Jenkins is used by teams of all sizes, for projects in a wide variety of languages and technologies, including .NET, Ruby, Groovy, Grails, PHP and more, as well as Java. Jenkins is an application that monitors executions of repeated jobs, such as building a software project or jobs run by cron (time-based job scheduler in Unix-like computer operating systems). Jenkins mainly focuses on two jobs:
- Building/testing software projects continuously Jenkins provides an easy-to-use continuous integration system, making it easier for developers to integrate changes to the project, and making it easier for users to obtain a fresh build. The automated, continuous build increases the productivity.
- Monitoring executions of externally-run jobs even those that are run on a remote machine. Jenkins keeps those outputs and makes it easy for you to notice when something is wrong.
Features
Jenkins offers the following features:
- Easy installable using war or deployable on the servlet container
- Jenkins can be configured entirely from its friendly web GUI with extensive on-the-fly error checks and inline help.
- Jenkins can generate a list of changes made into the build from Subversion/CVS. This is also done in a fairly efficient fashion, to reduce the load on the repository.
- Jenkins gives you clean readable URLs for most of its pages, including some permalinks like "latest build"/"latest successful build", so that they can be easily linked from elsewhere.
- Monitors build results by RSS or e-mail to get real-time notifications on failures.
- Builds can be tagged long after builds are completed
- JUnit test reports can be tabulated, summarized, and displayed with history information, such as when it started breaking, etc.
- Jenkins can distribute build/test loads to multiple computers.
- Jenkins can keep track of which build produced which jars, and which build is using which version of jars, and so on.
- Jenkins can be extended via 3rd party plugins.
Installation
Jenkins is easy to install, and can run just about anywhere. The first step for starting the installation of Jenkins is to install Java on the machine where we intend to install Jenkins. Jenkins is a Java web application, so to run Jenkins, minimally you need to have Java Runtime Environment (JRE) 1.5 or later. If we need to check the availability of the java in the system, we need to give the following command in by opening DOS console on windows
C:\Users\admin\> java -version
The above command displays the latest running version of java in the system. If Java is installed on the machine, we should get the following message:
java version "1.7.0_17"
Java(TM) SE Runtime Environment (build 1.7.0_17-b02)
Java HotSpot(TM) 64-Bit Server VM (build 23.7-b01, mixed mode)
If we don’t have a version already installed, or if your version is an older one i.e., less than 1.5 then, download and install the latest JRE installer from the Java website.
For Windows users, there is a graphical Windows installation package for Jenkins. The installer comes in the form of a ZIP file containing an MSI package for Jenkins, as well as a setup.exe file that can be used to install the .NET libraries if they have not already been installed on the machine. In most cases, all we need to do is to unzip the zip file and run the jenkins-x.x.msi file inside. The MSI installer comes bundled with a bundled JRE, so no separate Java installation is required. Once we have run the installer, Jenkins will automatically start on port 8080. The installer will have created a new Jenkins service that can be started and stopped just like any other Windows service. There are also excellent native packages for Mac OS X and most of the major Linux distributions, including Ubuntu, RedHat (including CentOS and Fedora) and OpenSolaris.
If we are not installing Jenkins using one of the native packages, we can simply download the latest binary distribution from the Jenkins website. Once downloaded, we have to place it in an appropriate directory on the build server. On a Windows environment, we might put it in a directory called C:\Tools\Jenkins (It is a good practice to not to place Jenkins in a directory containing spaces in the path, such as C:\Program Files, as this can cause problems for Jenkins in some circumstances). On a Linux or UNIX box, it might go in /usr/local/jenkins, /opt/jenkins, or in some other directory, depending on the local conventions.
Preparing Build Server for Jenkins
Installing Jenkins on the local development machine is one thing, but installing Jenkins on a proper build server deserves a little more forethought and planning. Before we start the installation, the first thing we will need is a build server. To work well, Jenkins needs both processor power and memory. Jenkins itself is a relatively modest Java web application. However, in most configurations, at least some of the builds will be run on the principal build server. Builds tend to be both memory and processor-intensive operations, and Jenkins can be configured to run several builds in parallel. Depending on the number of build jobs we are managing, Jenkins will also need memory of its own for its own internal use. The amount of memory required will depend largely on the nature of the builds. A build server also needs CPU horsepower. As a convention, we will need one processor per parallel build. It is also in the best interest to dedicate your build server as much as possible to the task of running continuous builds.
In particular, we should avoid memory or CPU-intensive applications such as test servers, heavily-used enterprise applications, enterprise databases such as Oracle, enterprise mail servers, and so on.
The memory usage of a Continuous Integration server is best described as spiky—Jenkins will be creating additional JVMs as required for its build jobs, and these need memory. Another useful approach is to set up multiple build machines. Jenkins makes it quite easy to set up “slaves” on other machines that can be used to run additional build jobs. The slaves remain inactive until a new build job is requested—then the main Jenkins installation dispatches the build job to the slave and reports on the results. This is a great way to absorb sudden spikes of build activity.
Jenkins Home Directory
Jenkins keeps all its important data in a special separate directory called the Jenkins home directory. Here, Jenkins stores information about the build server configuration, build jobs, build artifacts, user accounts, and other useful information, as well as any plugins that may have installed. The Jenkins home directory format is backward compatible across versions, so we can freely update or reinstall your Jenkins executable without affecting the Jenkins home directory. By default, the Jenkins home directory will be called .jenkins, and will be placed in the home directory. For example, if we are running a machine under Windows 7, and username is “admin”, we would find the Jenkins home directory under C:\Users\admin\.jenkins. Under Windows XP, it would be C:\Documents and Settings\Admin\.jenkins. On a Linux machine, it would be under /home/admin/.jenkins. And so on. We can force Jenkins to use a different directory as its home directory by defining the JENKINS_HOME environment variable. If we are running Jenkins in a Java EE container such as Tomcat or JBoss, we can configure the webapp to expose its own environments variables. For example, if we are using Tomcat, you could create a file called jenkins.xml in the $CATALINA_BASE/conf/localhost directory:
<Context docBase="../jenkins.war">
<Environment name="JENKINS_HOME" type="java.lang.String"
value="/data/jenkins" override="true"/>
</Context>
Jenkins will look for its home directory in the following places (by order of precedence):
1. A JNDI environment entry called JENKINS_HOME
2. A JNDI environment entry called HUDSON_HOME
3. A system property named JENKINS_HOME
4. A system property named HUDSON_HOME
5. An environment variable named JENKINS_HOME
6. An environment variable named HUDSON_HOME
7. The .hudson directory in the user’s home directory, if it already exists
8. The .jenkins directory in the user’s home directory
Starting Up Jenkins
There are several ways to run Jenkins on the machine. One of the easiest ways to run Jenkins for the first time is to use Java Web Start (JNLP - Java Web Start is a technology that lets you start up a Java application on the local machine via a URL on a web page—it comes bundled with the Java JRE). In our case, this will start a Jenkins server running on the machine, and let us experiment with it as if it were installed locally. All we need for this to work is a recent (Java 1.5 or later) version of the Java Runtime Environment (JRE).
The link to the JNLP is available under Test drive section Meet Jenkins page. When we click on the Launch button the browser will ask if you want to open a file called jenkins.jnlp using Java WebStart. Click on OK—this will download Jenkins and start it up on the machine.


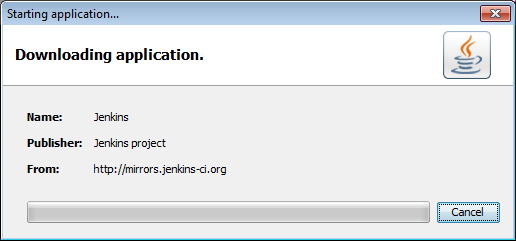
Java Web Start will only need to download a particular version of Jenkins once. From then on, when we click on the “Launch” button again, Java Web Start will use the copy of Jenkins it has already downloaded. Ignore any messages your operating system or anti-virus software may bring up—it is perfectly safe to run Jenkins on the local machine. Once it has finished downloading, it will start up Jenkins on your machine. We will be able to see it running in a small window called “Jenkins Console”
To stop Jenkins at any time, just close this window.
There are also installers available for the principal operating systems such as Windows, Ubuntu/Debian, Red Hat/Fedora/CentOS, Mac OS X, openSUSE, FreeBSD, OpenBSD, Solaris/OpenIndiana, Gentoo available on the Jenkins website.
Or, we may prefer to simply download the latest version of Jenkins war file (jenkins.war) and run it from the command line. Jenkins comes in the form of an executable WAR file. Once downloaded, we can start Jenkins from the command line as shown here:
C:\Users\admin\>java -jar jenkins.war
Whether we have started Jenkins using Java Web Start or from the command line, Jenkins should now be running on the local machine. By default, Jenkins will be running on port 8080, so we can access Jenkins in the web browser on url http://localhost:8080/. Alternatively, we can simply deploy the Jenkins WAR file to the application server such as Glassfish, IBM WebSphere, JBoss, Jenkins deployment in Apache Geronimo 3.0, Jetty, Jonas, Tomcat, Weblogic and Winstone.
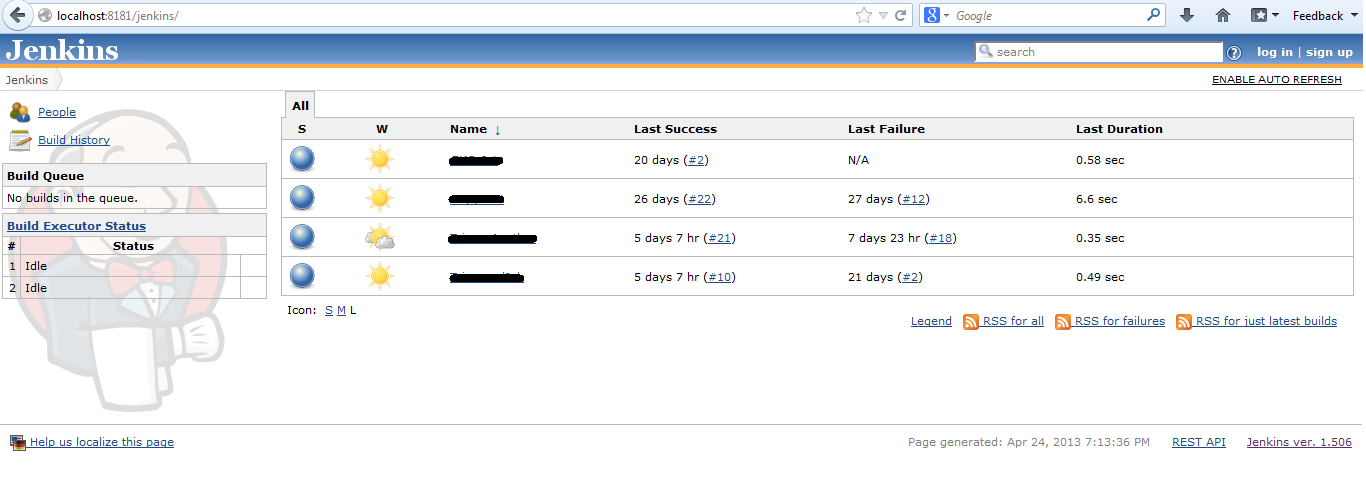
If we are running Jenkins on an application server, the URL that we use to access Jenkins will be slightly different. On a default Tomcat installation, for example, we can access Jenkins in your web browser on http://localhost:8080/jenkins. When we open Jenkins in the browser, we should see a screen like the one shown below image
Configuring Jenkins
Before we get started, we need to do configure Jenkins. That is, we need to tell Jenkins about the build tools and JDK versions which will be used for the builds. Click the “Manage Jenkins” link on the home page. This will take us to the Manage Jenkins page, the central one-stop-shop for the entire Jenkins configuration. From this screen, we can configure our Jenkins server, install and upgrade plugins, keep track of system load, manage distributed build servers, and more
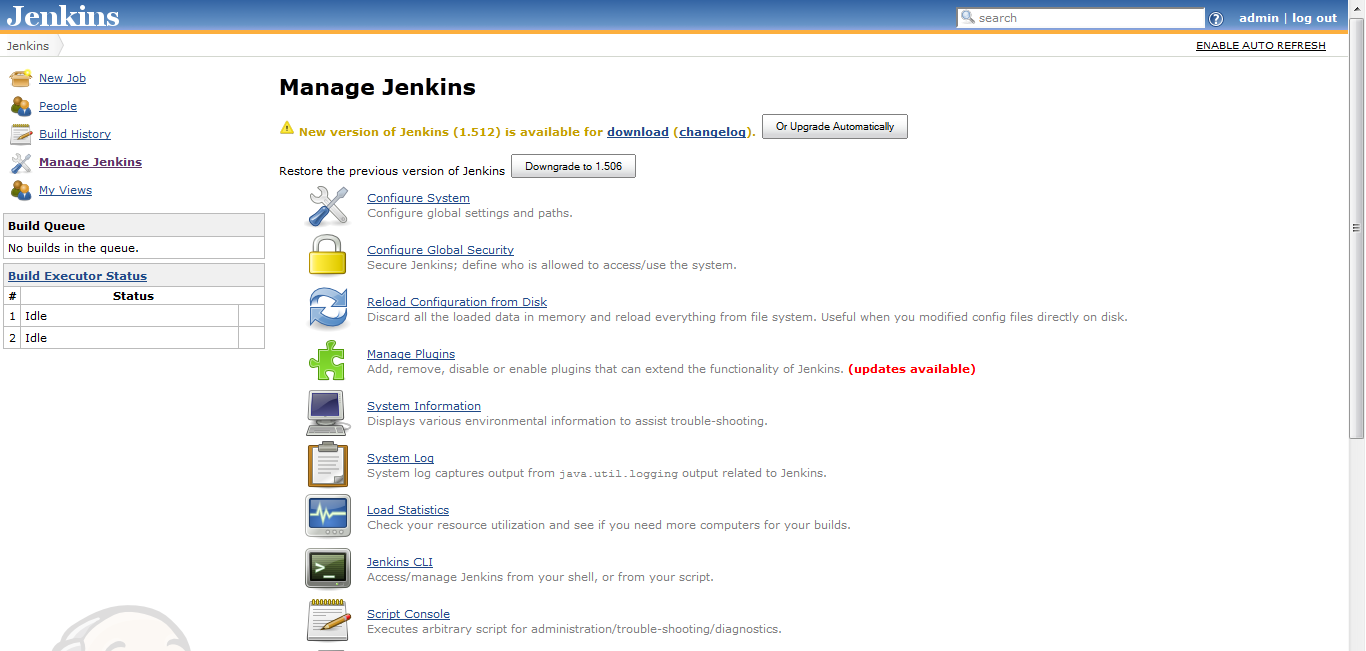
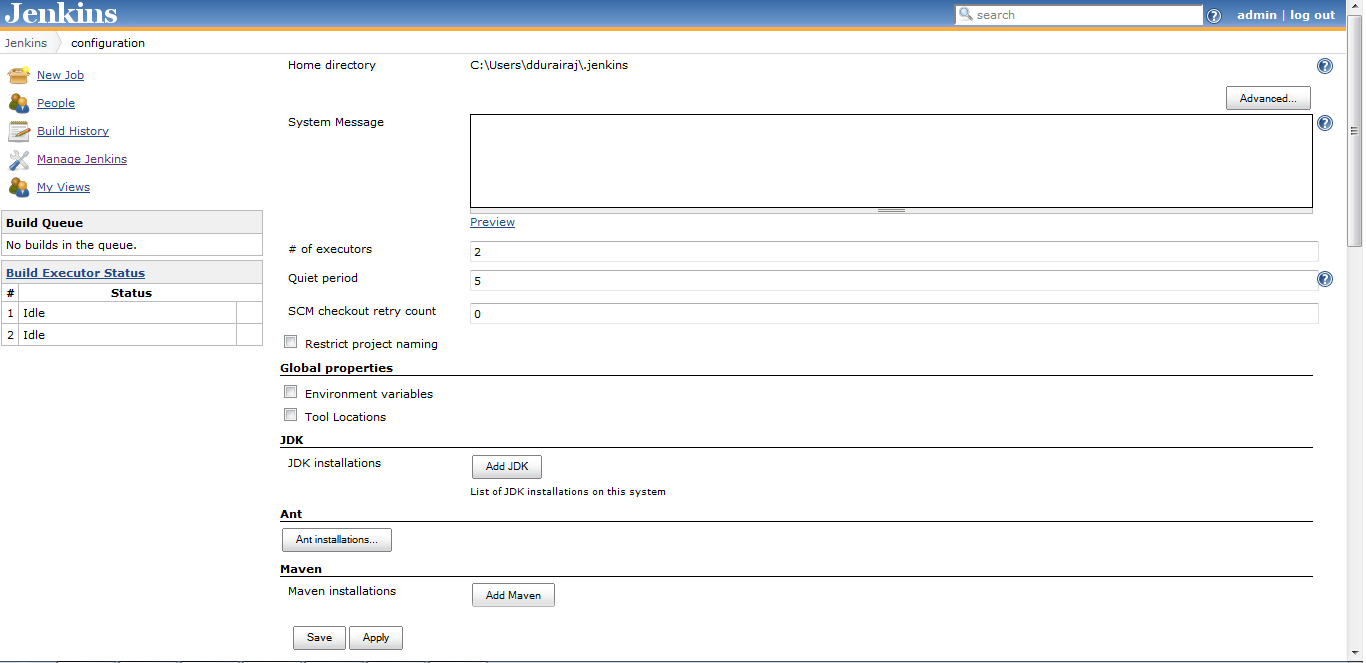
Clicking on the “Configure System” link will take us to the Configuration page. From here we can configure everything from security configuration and build tools to email servers, version control systems and integration with third-party software. The screen contains a lot of information, but most of the fields contain sensible default values, so we can safely ignore them.
Configuring JDK
If we have a Java JDK (as opposed to a Java Runtime Environment—the JDK contains extra development tools such as the Java compiler) already installed on the workstation, we can simply provide the path to the JDK in the JAVA_HOME field. Otherwise, we can ask Jenkins to download the JDK from the Oracle website the first time a build job requires it. We need to just pick the JDK version we need and Jenkins will take care of all the logistics. However, for licensing reasons, we will also need to tick a checkbox to indicate that we agree with the Java SDK License Agreement.
Notification
Another important aspect we would typically set up is notification. When a Jenkins build breaks, and when it works again, it can send out email messages to the team to spread the word. Using plugins, we can also get it to send instant messages or SMS messages, post entries on Twitter, or get people notified in a few other ways. It all depends on what works best for our organizational culture. Email notification is easy enough to set up if we know your local SMTP server address. We need to just provide this value in the Email Notification section towards the bottom of the main configuration page.
Plugins
Jenkins supports many 3rd party plugins to be able to use with the Jenkins application. The installation of new plugins and up gradation of the existing plugins is pretty simple. First of all, click on the “Manage Jenkins” link to the left of the screen to go back to the main configuration screen. Then click on Manage Plugins. This will open the plugin configuration screen, which is where we manage the extra features you want to install on your Jenkins server. There are four tabs namely Updates, Available, Installed, and Advanced. Click on the Available tab to see a very long list of available plugins. Find the plugin which suits our need and tick the corresponding checkbox, and then scroll down to the bottom of the screen and click on Install. This will download and install the plugin into the local Jenkins instance. Once it is done, we will need to restart Jenkins for the changes to take effect. To do this, you can simply click on the “Restart Jenkins when no jobs are running” button displayed on the installation screen, or alternatively we can shut down and restart Jenkins by hand.